9 Vegetables to Plant in July for a Thriving Fall Harvest
By July, vegetable plots often burst with abundant growth. Many crops planted in spring have reached a point of steady yield. In much of the country, hot temperatures speed up plant growth and accelerate maturation. Gardeners seeking a late-summer and early-fall harvest can take advantage of this heat by sowing a fresh wave of vegetables. Proper site preparation remains crucial. A bed enriched with several inches of aged compost supports water retention and provides key nutrients. Testing soil pH and amending to a range between 6.0 and 7.0 benefits most vegetables. Watering deeply in the early morning promotes deep root development. Mulching further conserves water, suppresses weeds and stabilizes soil temperature. Many vegetable seeds germinate easily in warm soil, allowing direct outdoor sowing. Certain seedlings demand a head start under grow lights or in a greenhouse before transplanting. Gardeners in cooler climate zones may use protective covers on especially cool nights. In very hot regions, afternoon shade cloth can prevent sunscald and heat stress. Veteran grower Briana Yablonski notes that attentive management yields a second harvest that rivals the first. By following variety-specific guidance and staying vigilant, gardeners can keep homegrown produce flowing through the end of the season.
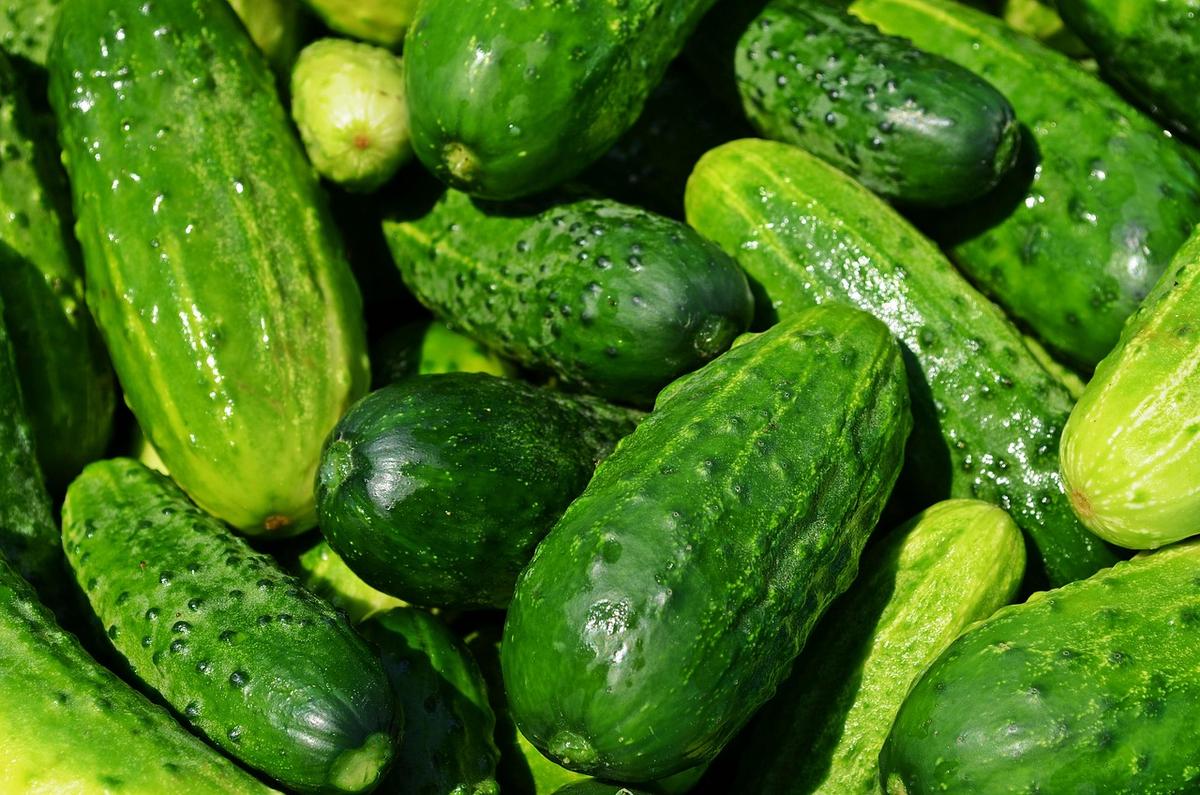
Cucumbers remain among the top choices for a midseason sowing. Their preference for warm, evenly damp soil makes July ideal for planting. Gardeners should aim for soil temperatures above 70°F to guarantee rapid germination, typically within four to seven days. Sow seeds about one inch deep in rows spaced three to four feet apart or in hill plantings with four seeds per hill on mounds of loose earth. Hills promote better drainage and warm up quickly after rain. At emergence, thin seedlings to the two strongest plants per hill. A balanced fertilizer, applied at planting and again when vines begin to run, delivers nitrogen for leafy growth and phosphorus for fruit development.
Cucurbit roots do not tolerate disturbance, so avoid transplanting when possible. Compact varieties like ‘Bush Champion’ or ‘Salad Bush’ perform well in containers or confined plots. Vining types deliver larger harvests when trained onto sturdy trellises or arbors, minimizing soil wetness contact and reducing disease pressure. Across zones 5 through 10, an early July planting should mature by early September. For gardeners in USDA zone 4 and colder locations, row covers may offer a few extra degrees of warmth during spring or early fall nights.
Pollination depends on visits from bees and other insects. Providing a patch of friendly flowers nearby or placing a small bee hotel can improve fruit set. Watch for cucumber beetles that chew on leaves and transmit wilt diseases. Yellow sticky traps and neem oil sprays manage early infestations. Maintaining good air flow around foliage helps block powdery and downy mildew outbreaks as humidity rises later in the season.
Zucchini generates prolific yields that make it a cornerstone of any July planting plan. Seeds sown directly into tilled soil germinate in around five to ten days when temperatures reach 70°F or higher. Plant seeds one inch deep in rows set three to four feet apart. For commercial-style production, space plants two feet apart, allowing vines to spread without competition.
Rapid growth delivers fruit in roughly 30 days post-germination. Harvest small squashes at six to eight inches for tender flesh and mild flavor. Larger fruits prove useful for stuffing or baking but may become stringy if left on the vine too long. Regular picking encourages continuous blooming and limits the risk of fruit rotting in overly humid conditions.
Zucchini vines can attract pests such as squash bugs and vine borers. Covering seedlings with floating row cover for the first three weeks deters early-season invaders. Gardeners should look under leaves for egg clusters and remove any they find. Beneficial nematodes applied to the soil combat vine borer larvae below ground. Mixing a handful of compost at planting provides a natural source of nutrients and supports water retention during dry spells.
Beyond classic dark green varieties, gardeners may try ‘Raven’ for deep green glossy skin, ‘Gold Rush’ for bright yellow fruit or ‘Costata Romanesco’ for ridged flavour-packed zucchinis. Training vines vertically on well-anchored trellises can free ground space for interplanted crops and ease harvest. Trellised zucchini remains cleaner with fewer soil pathogens in close proximity.
Summer squash includes a diverse group of tender varieties that flourish under warm conditions. Comparable to zucchini, these round and crookneck types prosper in earth rich in organic matter. Before planting, cultivate beds to a depth of at least eight inches and incorporate two to three inches of well-composted manure or garden compost. Soil that drains well remains critical, given squash susceptibility to crown rot in saturated ground.
Direct planting leads to germination in six to ten days when soil warms above 65°F. Sow seeds one inch deep in rows spaced three to four feet apart. Thinning to a vigorous plant every two to three feet gives each squash room for sprawling growth. A side dressing of a low-nitrogen fertilizer after flowering keeps plants productive without encouraging excess leafiness at the expense of fruit set.
Yields typically begin about eight weeks after sowing. Harvest every other day, checking for tender fruits between four and eight inches long, depending on the type. An overripe squash left on the vine can slow production. Common choices include bright yellow crookneck, scallop-shaped pattypan and the unusual round ‘Sunburst’. These options add color and textural variety to markets and home kitchens.
Pests and diseases follow patterns similar to zucchini. Neem oil spraying on warm evenings and manual removal of overwintering eggs can reduce squash bug pressure. Applying an organic mulch layer around plants helps stabilize soil temperature and retain water without wetting leaves excessively.
Carrots shine as a nutritious root choice for gardeners who plan plantings carefully. Warm July weather speeds germination when soil temperatures exceed 60°F, but erratic wetness levels present challenges. Achieving uniform sprouting requires soil worked into a fine, clump-free consistency free of rocks and debris. A tilth this smooth prevents crooked roots and fosters even water distribution.
Sow carrot seed in trenches one quarter to one half inch deep. As fine seed can wash away, water soil gently before and after sowing. Laying down weed-control matting or a lightweight row cover guards against evaporation and deters birds. Check the seedbed daily, since germination may unfold over two to three weeks.
Thinning proves vital. Once true leaves span an inch across, thin seedlings to two inches apart for small varieties and three to four inches apart for longer types. Pulled seedlings make tender microgreens that capture the flavor of carrot foliage. Consistent shallow watering ensures the soil stays damp enough to guide straight, plump roots rather than thin, woody taproots.
Gardening expert Briana Yablonski recommends long-rooted types such as ‘Danvers 126’ for deep beds and short Nantes selections for container culture. For heightened sweetness, allow carrots to undergo a light frost before harvesting. Those opting for winter storage can lift mature carrots and tuck them into a cool, humid cellar or pack them in damp sand to prolong quality through the season.
Beets deliver twofold value through vibrant roots and tender greens. These plants perform well when direct-sown in soil enriched with plenty of organic matter. Aim for pH between 6.0 and 7.0, adjusting soil with lime or sulfur according to test results. Sowing depth of one half inch fosters quick sprouting in seven to ten days.
Since each seed pellet contains three to four embryos, gardeners should thin to one plant every two inches after the first true leaves appear. Pulled seedlings serve as nutritious baby greens. Side-dressing with a balanced garden fertilizer containing potassium and magnesium improves root quality and leaf vigor. For boron support, mixing in a handful of azomite during bed prep can avert common disorders such as cracked or misshapen roots.
Mature roots emerge in eight to ten weeks, depending on variety. Root shoulders become visible at soil level as they swell; harvesting at two to three inches diameter yields the classic roasted beet size. Larger roots work best for pickling or winter storage. After harvest, trim tops to a half inch of stem to prevent sap loss from root bodies.
Storing beets in a cool, humid environment – such as a crisper drawer or a root cellar packed in damp sand – preserves texture and flavor through winter. Beet greens retain crispness when wrapped in damp paper towels inside sealed containers, ready for salads or sautés long after field production has ended.
Beans belong to the simplest vegetables for a late planting. With proper spacing and warm soil, seeds germinate within five to seven days. Bush types require no support. Sow half-inch deep in well-worked soil at two-inch intervals, thinning to four inches for vigorous pod fill. Pole beans need sturdy trellises or poles set before planting; seeds climb natural jute twine or metal cages readily.
Choosing cultivars wisely helps tailor the season to local conditions. ‘Provider’ and ‘Blue Lake’ bush beans harvest in roughly 55 days, making them ideal for regions with early fall frosts. Pole beans such as purple-hued or speckled heirlooms offer decorative pods and extended yields into cooler weather. Gardeners wanting dried beans may leave pods intact until leaves yellow and dry, then harvest into mesh sacks that deter rodents.
Leguminous roots fix nitrogen in soils, benefiting subsequent plantings. When introducing beans to fresh ground, dust seeds with Rhizobia inoculant to establish symbiotic bacteria. A light side dressing of compost tea during pod fill can boost yields and pod size. Applying mulch keeps soil temperature stable and suppresses weeds, cutting back on manual cultivation chores.
Peppers pose a different challenge since their development pace seldom fits direct July sowing. Nursery-bought seedlings offer the strongest start. Select plants with deep green leaves free of blemishes and compact root balls. Harden off by setting pots outdoors in a sheltered spot for a few hours each day until plants adapt to sun and wind.
Plant in full sun, spacing small-fruited varieties eight inches apart and larger types up to two feet apart. Incorporate well-rotted compost into planting holes and firm soil gently around roots. Water seedlings immediately after transplanting to settle soil, then maintain steady soil moisture in the top six inches during flowering and fruiting phases.
A balanced fertilization program includes a weekly feed with fish emulsion during bloom. To avoid blossom end rot, side-dress with crushed eggshells or apply a calcium-rich supplement at planting time. Mulching with organic materials prevents soil crusting and reduces evaporation, cutting down on frequent watering.
Flower buds typically self-pollinate, so few insect visits are required. Harvest pods at various stages – green, yellow or fully ripe red or purple – depending on flavor goals. Refrigerator storage in plastic bags preserves firmness for up to two weeks; frozen peppers maintain flavor in stews and sauces when properly blanched beforehand.
Swiss chard tolerates summer heat far better than lettuce or spinach and remains harvestable as frost approaches. Planting in July extends the harvest window into October. Mix three inches of compost into the top six inches of soil for a crumbly, nutrient-rich bed.
Sow seeds indoors under fluorescent lighting or direct-sow protected by a cloche. Germination occurs within five to seven days at soil temperatures above 60°F. Transplant robust seedlings when they reach three inches tall, spacing one foot apart in rows 18 inches apart. A phosphorus–potassium fertilizer applied at transplant time supports root development and leaf expansion.
Harvest outer leaves first by cutting at the base, leaving the central crown intact for continued growth. Chard regrows consistently, allowing multiple harvests from a single planting. Varieties such as ‘Bright Lights’, ‘Ruby Red’ and ‘Lucullus’ deliver colorful stems that enliven salads, sautés and stir-fries.
Brussels sprouts require a long season to develop tight buds and reach full flavor. July planting secures a robust crop before hard frosts. Prepare beds by tilling to a depth of 10 inches and mixing in three to four inches of aged compost. Broadcast a balanced organic fertilizer and rake in lightly to activate microbes.
Start seeds in containers by mid-spring. Transplant sturdy seedlings into beds by early July, spacing plants 18 to 24 inches apart. Set young sprouts slightly deeper than their nursery depth to encourage additional root formation and increase stability in wind. A second application of nitrogen-rich fertilizer at six weeks promotes vigorous stalk growth and full bud formation.
Pest management proves critical. Cabbage worms, aphids and flea beetles feed on young leaves and buds, so gardeners may cover plants with insect netting for the first three weeks. Remove coverings at bloom time to allow bees access to enhance pollination. Batches of Bacillus thuringiensis powder applied under leaves at dusk control caterpillar pests without harming beneficial insects.
Harvest begins with lower sprouts about an inch in diameter. Work upward along the stalk, snapping each bud from the stem. Cutting away yellowed or damaged leaves as you go maintains airflow and sends energy to developing buds higher on the plant. Light frost exposure can improve sweetness, turning Brussels sprouts into a highlight of fall and winter meals.