How To Install A Gas Patio Fire-Pit Effortless
Think you need pros to add a fire pit? Not at all. In one afternoon you can build a gas patio fire pit and enjoy a cozy glow without the fuss. It’s easier than you think!
We’re walking you through six easy steps. You’ll pick the perfect spot, hook up the gas line, and spark that first flicker of flame. And yes, we’ll cover safety and give you time and cost estimates for each step. Before you know it, you’ll feel the gentle heat on your face as your patio becomes the new gathering spot.
Ready to get started? Let’s dive in and light up your backyard.
Introduction & Quick Steps
Nothing beats gathering around a crackling fire on a clear night. You can build a gas patio fire pit in six easy steps. I’ve added time estimates and cost ranges for each phase so you can plan ahead. Let’s dive in.
- Choose and prep your spot (2 to 3 hours, $0 to $50)
- Gather tools and materials (1 to 2 hours, $300 to $1,500)
- Lay your foundation (1 to 2 hours, $50 to $200)
- Hook up the gas line (1 to 2 hours, $0 to $100)
- Assemble and test your fire pit (1 to 2 hours, $0 to $50)
- Finish and inspect (30 to 60 minutes, $0 to $20)
Read on for step by step tips on each phase.
Site Selection and Patio Foundation Preparation for Gas Fire Pits
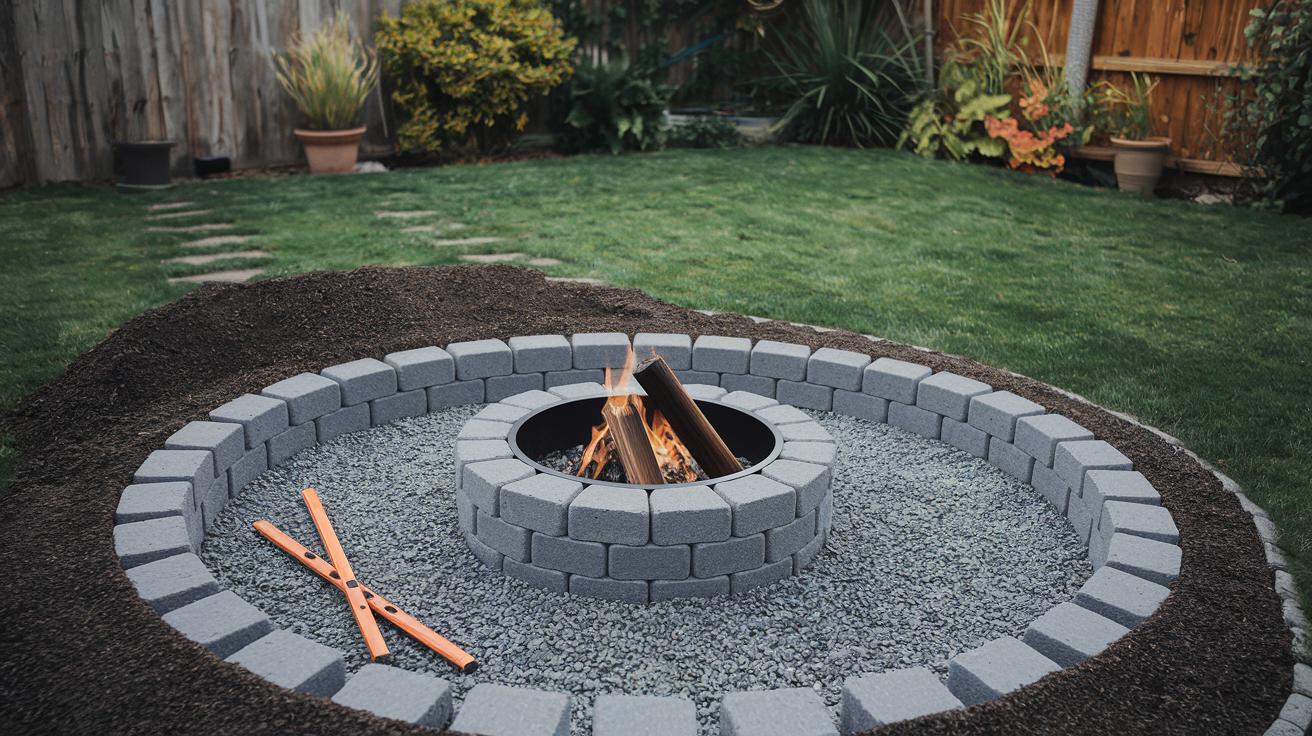
First, find a spot at least 10 feet from walls, overhangs, or any wood fence. You want a flat, open area so sparks won’t drift into shrubs or deck railings. If the ground already feels solid, like packed dirt or old gravel (small rock pieces), that’s even better.
Clear away the topsoil (the upper layer of earth) and grass down about 4 inches. Grab a shovel and dig evenly, aiming for a nice, level hole. By the way, my dog once tried to help and ended up burying his toy in the dirt, oops! Keep your edges straight by running string between stakes and checking your lines.
Now spread a 2-inch layer of gravel or coarse sand (tiny, rough grains) in the hole. Press it down firmly with your feet or a tamper. This base stops water from puddling under your fire pit. I love feeling the cool grit under my boots as I step. Use a straight board to glide across the surface, side to side, to make sure it’s perfectly even.
Next, mix up concrete (cement mix) and pour it to about 4 inches thick inside your framed area. Smooth the top with a trowel (flat finishing tool), then lay a level across it, first one way, then the other, to confirm it’s totally flat. These simple concrete pad steps give you a solid platform. Let the concrete cure (harden) for at least 24 hours before you set up your gas fire pit.
Essential Tools and Components for Gas Fire Pit Assembly
Getting set for your diy fire pit kit? Here’s what you’ll want on the patio before you start. I promise this saves headaches later.
Materials
- Gas-rated fire pit kit (includes the fire bowl, burner, and control panel)
- Approved rigid gas pipe or flexible gas line (pick the type that matches your setup)
- Manual shutoff valve (lets you quickly cut gas flow within 6 feet of the pit)
- Gas regulator (device that steadies fuel pressure for propane or natural gas)
- Spark igniter module (battery-powered unit that creates the electric spark)
By the way, I once grabbed the wrong valve and had to swap it out mid-build, lesson learned!
Tools
- Pipe wrench and adjustable wrench (for snugly tightening metal fittings)
- Drill with masonry bits and a regular screwdriver (for drilling pilot holes)
- Gas-rated pipe-thread sealant or Teflon tape (to keep those gas joints leak-free)
- Level (ensures your fire pit sits flat and stable)
- Safety gear: sturdy work gloves (protect your hands), goggles (shield your eyes), and closed-toe shoes
With everything lined up, you’ll breeze through hooking up fuel lines, tightening fittings, and testing your fire pit without a hitch. Enjoy that first flicker!
Propane and Natural Gas Line Installation for Patio Fire Pits
Have you ever felt the warm crackle of flames and smelled wood smoke on a cool evening? Getting your gas hookup just right is the key to those glowing nights. And trust me, a safe connection sets you up for perfect marshmallow-roasting moments.
First, grab piping approved for gas lines (it meets safety rules) or a flexible gas hose sized to your fire pit kit. Check the label so you know it’s the right fit.
For propane setups, here is my go-to:
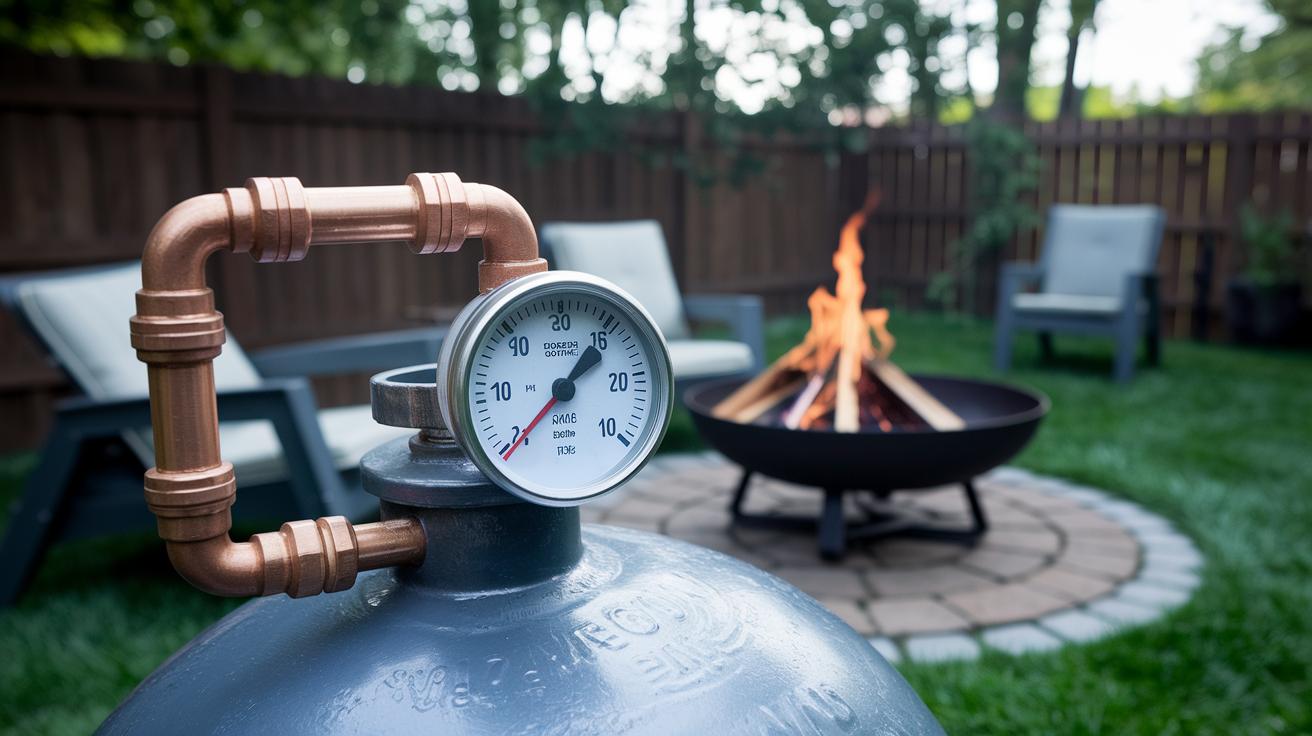
- Install the gas regulator (a gadget that keeps pressure steady) on the tank outlet.
- Thread on the flexible hose by hand, then finish with an adjustable wrench.
- Tighten enough to stop leaks but not so much you crush the fitting.
When you’re using natural gas, switch to rigid pipe or copper tubing rated for fuel lines. Then follow these steps:
- Check the supply pressure, which is usually around seven inches water column (a simple gas pressure measure).
- Connect the incoming line to your fire pit’s gas inlet with pipe-thread sealant (sticky stuff that seals threads).
- Push copper pipe through steel conduit (a metal sleeve that guards the line) whenever you go through walls or structures.
Now, don’t skip the emergency shutoff valve. Mount it within six feet of the fire pit at waist height and give it a clear label. That extra step means you can cut the gas fast, even in the dark.
Once you’ve got every fitting in place, do a quick leak check. Spray on soapy water or eyeball each joint for bubbles or drips. A clean test today means more smiles later when the fire pit’s steady glow lights up your backyard.
Assembling Your Gas Fire Pit Kit and Burner System
We’ll stick to the manufacturer’s step-by-step guide so nothing slips by. Gather your tools first: an adjustable wrench, a couple of screwdrivers, and a flashlight if you’re under a shady spot.
-
Spread all your parts on a flat area beside your concrete pad (the flat surface you built). You should have the fire bowl, burner, control panel, fasteners (screws and bolts), brackets, rubber gaskets (rubber seals), and fiber washers (flat pads to protect metal). By the way, I once tossed the lock washers by mistake. Oops.
-
Set the fire bowl on the cured pad. Feel that cool metal under your palms. Use a level side to side and front to back to make sure it does not tilt before you bolt it down.
-
Place the burner plate in the bowl’s center. Thread each screw in by hand into the brass insert (the metal anchor). Then finish with your wrench. Hand-tight is enough to avoid stripped threads.
-
Line up the burner’s brass inlet with the gas inlet hole. Slide it forward until it rests firmly on the rubber gasket.
-
Clip on the burner brackets or safety clips following your DIY fire pit kit guide. Press each clip until it clicks. Then give a gentle tug to make sure nothing wiggles.
-
Install the manual override or match-light setup if your model has one. Slide the control knob onto its stem, then lock it in place with the retaining clip. Turn the knob to check it moves smoothly.
-
Route the spark igniter wires along the base so they do not get pinched by bolts. Use the provided zip ties. A firm pull will show each wire is snug in its connector.
-
Compare your parts to the kit diagram. Catching a missing gasket or screw now will save an extra trip later.
But here is a tip. Don’t skip a single clip or screw. Small gaps can cause wobbling once the pit heats up.
Take a moment to look it over. Every piece should sit flat and solid before you move on to leak testing.
Leak Testing and Ignition Setup for Gas Patio Fire Pits
Grab a spray bottle or a small brush. Mix a few drops of dish soap in water. Slather each valve, joint, and gas fitting with the soapy mix. I love how the suds cling to metal.
Then turn on the gas supply. Do it slowly. Look for tiny bubbles shimmering at the connections.
Those bubbles mean gas is escaping. If you spot them, tighten the fitting or reseal it. Keep going until the suds hold still without a single bubble.
Next, spray the soapy mix on the regulator outlet and every connector. Open the gas valve just a crack. Wait about 30 seconds.
Mark any leaks with tape or a marker. Shut off the gas and snug up those fittings. Repeat the test until no bubbles appear.
If you have a pressure gauge, hook it to the shutoff valve port. Open the gas valve and watch the needle for about a minute. A steady needle means good pressure. A drop means it’s time to recheck fittings or swap out worn parts.
Now let’s hook up the ignition module wiring. Follow the kit diagram. Match each spark igniter wire to its connector.
Tuck wires away from pinch points. Secure them with zip ties. Pop in the igniter battery if needed. Give the module a gentle shake so contacts settle.
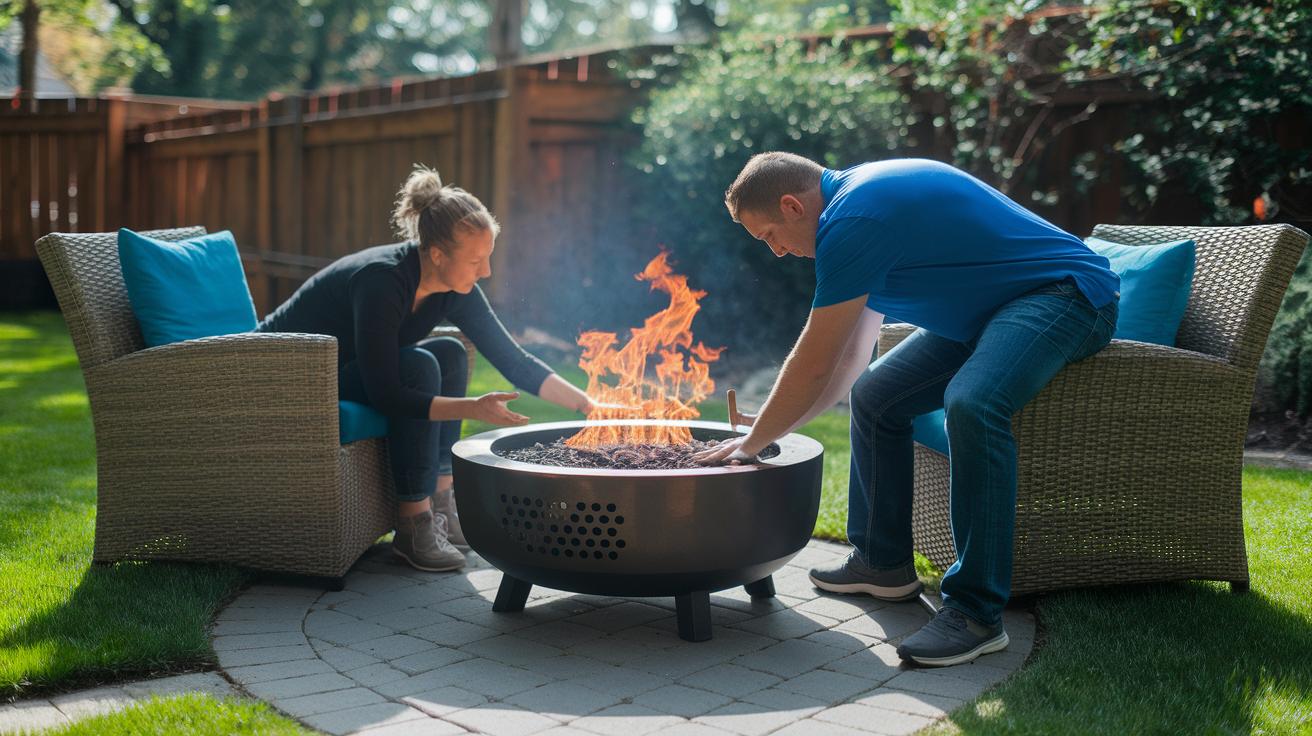
Time to light it up. Turn the control knob and press the igniter button a few times. Listen for the click. Watch for a spark.
If you don’t see one or if the flame dances unevenly, swap the battery. Clear any dirt from the burner ports. Check that wires are snug.
Once you have a bright, steady flame, you’re ready for your first backyard gathering. Enjoy.
Building Codes, Permits, and Safety Clearances for Gas Fire Pits
Thinking about a cozy gas fire pit but dreading the paperwork? A quick chat with your local fire marshal (person who enforces fire laws) or building department clears up the rules on gas pits. Some towns tell you exactly where your pit can go or how your piping needs to run. Jotting down those zoning rules saves headaches later.
Getting a permit means filling out a form, paying a small fee, and waiting a week or two. Some areas let handy homeowners hook up the gas (if you feel confident), while others insist you hire a licensed pro. Oops, I once grabbed the wrong form, right? But the building office will point you in the right direction.
Your building regs summary (list of rules) spells out what materials you need, how deep buried pipes must go, and what your inspector will check off. You’ll learn which pipe type is approved and how to route it safely around patios or decks. Think of it like a recipe: follow each step so your fire pit lights up without a hitch.
Safety clearances mean leaving at least 10 feet between your fire pit and anything flammable, fences, walls, or overhangs included. Measure from the pit’s edge to nearby objects before you fire it up. Keep grass or mulch trimmed back so stray sparks don’t find extra fuel.
And don’t toss your permit copy or site sketch. Save them with any inspection notes in a folder or binder. That way, if you ever sell your home, you’ve got proof your fire pit was built by the book.
Maintenance, Troubleshooting, and Cover Protection for Gas Patio Fire Pits
A quick seasonal check keeps your gas fire pit glowing bright and you cozy.
Each month, do a gas leak check (test for escaping gas) by spraying soapy water on the fittings. Have you ever spotted a bubble? That little swirl means you need to tighten or replace a fitting.
Once a year, clean the burner ports (tiny holes where the flame comes out). Brush away soot and debris that can block those holes. Your flame will thank you.
Every season, spray the control valves (knobs that let gas flow) with a light silicone spray. This helps the knobs turn smoothly. Oops. I once woke up to a stiff valve on a frosty night. Not fun.
When winter rolls in, cover your pit. A heavy-duty weatherproof cover (polyester with PVC backing or UV-treated vinyl) shields metal from rain and snow. But first, shut off the gas at the valve so no moisture seeps in and freezes inside.
Trouble lighting or seeing an uneven flame? No sweat.
No spark? Swap the igniter battery and double-check wiring clips.
Weak or patchy flame? Open the gas valve all the way and clear out any pebbles or spider webs hiding in the ports. I once let a spider web choke my flame, lesson learned!
A little upkeep goes a long way. Do those monthly checks, winterize with a snug cover, and fix hiccups fast. Then you’ll enjoy crackling warmth all year-round.
Final Words
In the action, you’ve seen the 6 simple steps. You chose a spot, prepped a solid pad, lined up your tools, hooked up gas, snapped the kit together, then tested for leaks and spark.
You’ve covered code checks, permit must-dos, and a seasonal checklist for leak tests and weather covers.
Ready to light things up? With these tips you’ll have a warm patio hub in no time.
Go ahead and try out how to install a gas patio fire pit yourself, you’ve got this!
FAQ
How long does it take and what does it cost to install a gas patio fire pit?
The installation takes about one day and ranges from $300 to $1,500, covering site prep, materials, gas hookup, assembly, testing, and final inspection.
What do I need to prepare the site and foundation?
Preparing the site means picking a spot with at least 10 feet of clearance, digging a shallow hole, adding a gravel or sand layer, then pouring and leveling a concrete pad 4–6 inches thick.
Which tools and parts do I need to assemble my gas fire pit?
Assembling your fire pit requires a gas-rated kit, rigid or flexible gas line, shutoff valve, regulator, spark igniter module, pipe wrench, adjustable wrench, drill with masonry bits, sealant tape, plus gloves and eye protection.
How do I connect propane or natural gas lines safely?
Connecting gas lines starts by fitting the regulator at the propane tank or confirming 7-inch water column pressure for natural gas, installing a shutoff valve within 6 feet, then routing approved piping or flexible hose.
How can I test for gas leaks and set up ignition?
Testing for leaks means brushing soapy water over valves and fittings, watching for bubbles, tightening any leaks, then wiring the ignition module, inserting a battery, and running a few spark tests until flames burn evenly.
Do I need permits or code approvals to install a gas fire pit?
You need a local permit and must follow fire codes that often require a licensed pro for gas hookups. Check zoning rules, apply for permits, and keep paperwork handy for inspections.
What safety clearances should I follow around my fire pit?
Keeping at least 10 feet from buildings, walls, and vegetation prevents accidents. Keep overhead structures, patio umbrellas, and plants well clear before lighting your fire pit.
How do I maintain and winterize my gas patio fire pit?
Maintaining your fire pit means checking for leaks monthly, cleaning burner ports once a year, lubricating valves each season, shutting off the gas, and covering the pit with a weatherproof cover before winter.
What common issues might I troubleshoot with my fire pit?
Troubleshooting often means clearing debris from burner ports, checking spark igniter wiring, making sure the gas supply is open, and tightening loose fittings if flames are weak or ignition fails.
How can I compare DIY vs professional installation costs?
A DIY install costs $300–$1,500 in materials and a day of work. Hiring a pro adds labor fees of $500–$1,000 but may speed up gas code compliance and final inspections.