Soil pH Testing Methods For Home Gardens Amazing
Have you ever wondered if your tomato plants are really getting the right meal?
It might not be your watering routine.
It could be the soil pH (a scale that tells you if your dirt is more acidic or more alkaline).
That hidden number can turn droopy seedlings into a booming harvest.
Let’s explore three fun, easy methods to check it.
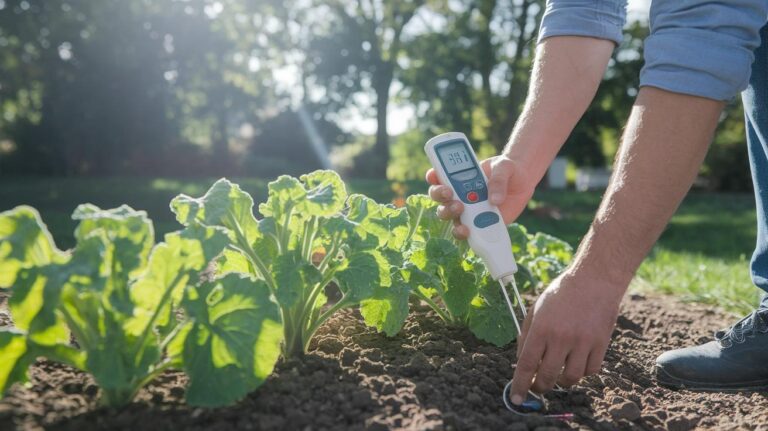
First, try a digital meter. You just stick its probe into moist soil, feel the cool tip sink in, and watch the number pop up on the little screen.
It usually runs about fifteen to thirty dollars, heads up, I once dropped mine in the grass and spent half an hour hunting for it.
Second, grab a chemical kit. Scoop out some soil, stir in a test solution, and wait for the color to burst on a strip.
It’s around ten dollars for a pack, and you’ll feel like a backyard scientist as colors swirl.
Third, use the red cabbage trick. Chop up a leaf and soak it in hot water until it’s deep purple. Then add a bit of soil. If the water shifts to pink, your soil is acidic. Green or blue means it’s alkaline.
This method is nearly free and feels like a kitchen experiment.
Each tool has its ups and downs.
Digital meters are fast and precise but cost more.
Chemical kits give you multiple tests for little money, though mixing can get messy.
The cabbage trick is budget friendly and fun, even if it’s a bit less exact.
Pick the one that fits your budget and gardening style.
Once you nail your soil pH, you can tweak it with lime or sulfur and watch juicy, sun-warmed tomatoes pop up on your vine.
Happy gardening!
Essential Soil pH Testing Methods for Home Gardens
Have you ever wondered if your tomato plants need more or less acidity? Testing soil pH (a scale that shows how acidic or alkaline soil is) can make a big difference. You’ve got three easy options: digital meters, chemical kits, or homemade indicators. Each feels like a mini adventure in your garden.
And digital pH meters cost between $15 and $50. Pop the probe into moist soil and get a number in seconds. It’s usually precise to 0.1 pH units (that means small changes matter). But remember to clean the probe gently and use a buffer solution (a mix that helps keep your meter accurate) now and then.
Chemical test kits run about $10 to $20 and are a breeze to use. Scoop a tablespoon of soil and a teaspoon of distilled water (water with impurities removed) into a test tube. Add a drop of reagent (a chemical that shows acidity by changing color). Give it a shake and match the result to the chart to see soil acidity within about 0.5 pH.
DIY indicators bring a bit of kitchen chemistry to your backyard. Chop up a cup of red cabbage and simmer it in two cups of water for 10 minutes. The purple liquid turns red in acidic soil or green in alkaline spots. It won’t give you exact decimals, but it’s cheap, fun, and a great way to get kids curious. Oops I spilled some once. Garden lab accidents happen right?
No matter which way you go, start by digging soil cores about 4 to 6 inches deep in a few spots. Mix them in a clean bucket. Flick away stones and roots. Then grab your blended sample and test away.
| Method | Cost | Accuracy | Ease of Use |
|---|---|---|---|
| Digital pH Meter | $15–$50 | ±0.1 pH units | Medium (needs calibration) |
| Chemical Test Kit | $10–$20 | ±0.5 pH units | High (mix and match colors) |
| DIY Indicator | Under $5 | Ranges: acidic, neutral, alkaline | High (prep and visual) |
Testing Garden Soil pH with Digital pH Meters

Have you ever wondered if your garden soil is just right for your new seedlings? A digital pH meter (a small device that checks soil acidity) lets you know in seconds. You gently press its probe (the sensor tip) into damp soil and watch the number pop up. It shows you a reading with a decimal, so you can catch tiny shifts in acidity before your plants complain. Just keep an eye on soil wetness and probe condition or your numbers might wander.
- Pick a meter made for garden soil.
- Scoop a few soil cores (dirt samples) from different spots.
- Mix them in a clean container and add a splash of water until it’s damp.
- Calibrate the meter in pH 7.0 buffer solution (liquid with neutral acidity), then pH 4.0 buffer solution (liquid with mild acidity).
- Rinse the probe with distilled water and stick it into your soil mix.
- Wait for the reading to settle.
- Jot down the pH number and the date.
Calibrating and Maintaining Your pH Meter
Calibrating once a month keeps your meter steady. Grab fresh buffer packs. Pour a bit of pH 7.0 solution into a clean cup. Rinse the probe, dip it in, and turn the meter until it reads seven. Then switch to pH 4.0 solution and adjust the low end. This two-point calibration helps your meter track the full acidity range in your garden.
After testing, rinse off the probe in distilled water to wash away dirt or salts. Gently pat the glass tip dry with a soft cloth, scratches can make readings jump around. Slip the probe into its storage cap, add a few drops of storage solution or clean water, and snap the cap on tight. Keeping that sensor tip damp helps every reading stay crisp.
Chemical Soil pH Kits for Home Gardeners
Testing your soil pH at home is like a little backyard science project that helps your plants thrive. You’ll find these kits at garden centers or online. They come with tiny packets of reagent (a chemical that changes color), clear plastic tubes, and a color chart you hold up like a paint sample.
To test, scoop a spoonful of air-dried soil (loose dirt left out to dry) into a tube. Pour in a bit of distilled water, add one drop of reagent, and swirl gently. Watch the water shift to pink, green, or blue. Then match that shade to the chart. You’ll see your soil pH within about plus or minus half a point. Oops, I once spilled a drop on my deck, left a little pink circle for days!
When you pick a kit, make sure it lists its full pH range and has bold, easy-to-read colors. Wear gloves if you want clean hands, those reagents can stain. If you splash any on your skin, rinse under cool water right away.
Store your test tubes, reagent bottles, and color cards in a cool, dry, dark spot so the chemicals stay strong and the prints don’t fade.
Testing soil pH might sound fancy, but it’s really just a few simple steps. And knowing your pH helps you decide if you need lime, sulfur, or nothing at all. Happy planting!
Colorimetric Natural Indicators for Soil pH Testing

Remember the red cabbage trick we demoed for checking soil pH (soil acidity level)? It’s a DIY indicator (simple home test) where that deep purple juice shifts to pink or green once you stir it into damp dirt.
And if you’re curious for more quick tricks, peek at the sidebar experiments. You’ll find a vinegar fizz test to spot alkalinity and a coffee slurry acidity check. Yes, your morning brew can give you soil clues too.
Proper Soil Sampling for Reliable pH Measurements
Ever wonder why some parts of your garden glow while others just don’t? It often comes down to pH (how acidic or alkaline your soil is). To get a fair reading, you’ll need to pull samples at the same 4-6 inch depth from five to ten spots. Mixing those soil plugs (cores of earth) gives you an average number, so one odd patch can’t throw you off!
How to Dig Reliable Cores
Grab a bulb planter (tool for pulling a soil plug) or a trowel (small hand shovel). Push it down about 4-6 inches, twist, then lift out your plug. Rinse the tool after every core so dirt from one hole doesn’t mess up the next. Wear gloves if you like, and gently tap each plug into a clean bucket.
Blending Your Samples
Dump all your plugs into a clean bucket. Stir slowly with a plastic scoop or trowel. As you mix, pick out stones, bits of root, or any big clumps. Then set aside about ten percent of the very lightest or heaviest bits, they can skew your test. Spread the rest in a thin layer on a tray and let it air dry for a few hours. A mostly dry sample gives you more steady pH readings.
Interpreting Soil pH Results and Accuracy Tips

When you test your soil, you get a number called pH. Below 7 means your soil is acidic. Above 7 means it’s alkaline. Most veggies grow best around 6.0 to 7.0 pH because nutrients like phosphorus (builds roots), nitrogen (fuels leafy growth), and potassium (strengthens stems) dissolve just right there.
Soil microbes (tiny helpers that break down dead plants and feed your soil) thrive near neutral pH. If your soil drops below 6.0, those microbes slow down and iron or aluminum can build up and hurt roots. If it jumps above 7.5, calcium and magnesium tie up nutrients so plants and microbes can’t reach them.
Moisture matters too. A dry sample can give you a falsely high reading. A waterlogged sample can skew low. Test when the soil feels damp, like a wrung-out sponge and not dripping wet.
Every tool has a little wiggle room, often about a half-point. That means a 6.5 reading could really be 6.0 or 7.0. To keep your results steadier, try these tips:
- Keep the soil damp but not soggy before you test.
- Test the same spot again a day later for a clear comparison.
- Plan your lime or sulfur adjustments with a half-point buffer.
Oops, I once tested completely dry soil and got a wild pH number.
Adjusting Garden Soil pH After Testing
After you test your soil with a simple pH kit, you’ll know if it’s under 6.0 (too acidic) or above 7.0 (too alkaline). Feeling the warm earth crumbling between your fingers can be a thrill, right? If it’s acidic, sprinkle agricultural lime (finely ground limestone) over bare soil in fall or early spring so rain can wash it in (oops, I once spilled half a bag on my patio). If it’s alkaline, dust on elemental sulfur (pure sulfur powder) before heavy rain or water it in deeply after. Both these helpers work slowly, so giving them time before planting really pays off.
The amount you need depends on your soil type. For sandy soil (loose, gritty grains), spread about 5 lbs of lime per 100 sq ft. For clay soil (dense, sticky soil), use 10 lbs per 100 sq ft. To nudge pH down about 0.5 over six to eight weeks, add 1 lb of sulfur per 100 sq ft. Kind of like a slow sink fizzing with baking soda and vinegar.
You can also stir in natural fixers like wood ash (gray powder from burned wood) to raise pH or leaf mold (decayed leaves that feel soft) to gently buffer acidity. But test again before you go all in.
Both lime and sulfur need patience. Lime often takes months to lift pH and sulfur drops acidity in about six to eight weeks. After two months, test again and, if you need more, add a thin top layer. Doing this in cool seasons like fall or early spring lets rain and morning frost spread and settle your amendments before plants wake up.
Budget-Friendly vs Professional Soil Analysis Options

Have you ever turned your garden soil into a quick science project? DIY soil pH kits (measuring acidity level) cost about $10 to $50. You scoop a bit of warm earth, mix it with water, and see a color change or digital number in minutes! It’s a simple, low-cost nudge when your beds need a dash of lime or sulfur. But these kits don’t check nutrients like nitrogen or potassium (plant food), and results can swing by half a point.
For about $15 to $40 per sample, you can tap into extension lab tests or private agronomist services. You mail off dried soil cores (tiny soil samples) and wait one or two weeks. Then you get a full report on pH, nitrogen, phosphorus (root grower), potassium, calcium (cell builder), and buffering capacity (soil’s defense). You even get custom amendment rates to suit your garden’s needs.
If your change jar is small and you just want to keep tomatoes happy, go DIY. But if you’re revamping a big veggie patch, wrestling stubborn acidity, or craving exact nutrient levels, order a lab test. Your garden will thank you!
Final Words
We dove into digital meters, chemical kits, and red cabbage indicators with cost, ease, and accuracy in mind. We covered proper sampling, reading results, making fixes with lime or sulfur, and when to spring for a lab.
Plant nutrients thrive at the right pH. Armed with these steps you can pick what fits your budget and expertise.
With these soil pH testing methods for home gardens, every scoop of dirt gets you closer to a thriving, low-fuss backyard harvest.
FAQ
How do I test my garden soil pH with a digital meter?
Testing soil with a digital meter involves calibrating probes in pH 7.0 and 4.0 buffers, inserting the cleaned probe into a moistened soil sample, waiting for a stable reading, and recording the result.
What steps do chemical soil pH kits involve?
Using a chemical soil test kit involves mixing one tablespoon soil with one teaspoon distilled water and reagent, shaking for one minute, then matching the sample’s color to a chart for about ±0.5 pH accuracy.
How can I make a DIY natural pH indicator?
Making a cabbage juice indicator means simmering one cup chopped red cabbage in two cups water for 10 minutes, straining, then mixing soil with the liquid to watch red-to-green-to-blue color shifts.
How should I sample soil for accurate pH testing?
Sampling soil properly means taking 4–6 inch cores from five to ten spots, removing surface debris, then mixing cores in a clean container before testing to capture an average bed reading.
What do soil pH results mean for my plants?
Soil pH results below seven show acidity, while above seven show alkalinity; most vegetables thrive in a 6.0–7.0 range where nutrients are available and soil microbes stay active.
How can I adjust garden soil pH after testing?
Adjusting soil pH uses agricultural lime at five to ten pounds per 100 square feet to raise pH, or elemental sulfur at one pound per 100 square feet to drop about 0.5 pH over six to eight weeks.
When should I choose lab soil testing over DIY methods?
Choosing lab testing makes sense when you need detailed nutrient profiles, buffer capacity values, and expert amendment rates; labs cost about $15–$40 per sample and deliver deeper analysis.